
Each industry has shifted to new paradigms due to the intensified development of robotics, which is now seamlessly integrated with automation and intelligent systems. Since every robot is designed using a specific circuit architecture that defines its operation, a robot’s efficiency, versatility, and adaptability hinges on its capability. This article seeks to navigate the detailed terrain of robotic circuit design and discuss the guiding principles, techniques, problems, and solutions involved at each level of advanced robotic system development. From hobbyists to professionals, all in robotics will appreciate the details provided in this guide on processes ranging from design conceptualization to system deployment. Brace yourself to learn about the fundamentals, methodologies, and modern milestones that define robotics today.
What is a Robot Circuit?

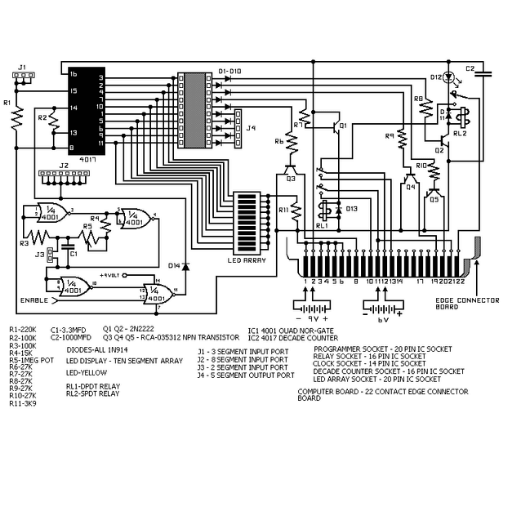
A robotic circuit is the primary structure of the power framework that allows the robotic system to do work. Power, sensors, actuators, and control units, among others, are linked together and integrated to form a set of subsystems in a network that receives data and processes with transforms or delivers responses as actions. The hardware and software systems of the robot-droid are interfaced through the peripheral bridging frameworks which makes the robot work smoothly. A robotic circuit design is one of the factors that fundamentally influences the construction of the robot.
Introduction to Conductive Pathways
The conductive pathways are the pathways that are present in an electrical circuit, and these pathways make the flow of electric current possible. It is common practice to construct these pathways out of metals that have good electrical conductivity, such as copper or silver, in order to reduce energy loss and maintain effective power transfer. These pathways connect links between power sources, sensors, and actuators, enabling the complete circuitry to work seamlessly. A good designed pathway makes sure reliable performance is sustained by reducing energy loss, this saves power and improves the overall system effectiveness.
Key Components of a Robot Circuit
A robot circuit includes essential constituents that synergistically allow for a robot to function. Ever component is important in maintaining the efficiency, control, and response aspect of the system as a whole. Each parts are outlined below:
Power Supply
- The provided electric energy enables the robot to operate, which is facilitated by the power supply. Some examples are batteries, such as lithium-ion or even alkaline cells, alongside power adapters. Small robots are often powered using lithium-ion batteries, which are 12V and 2000mAh, proving both efficiency and portability.
Microcontroller or Microprocessor
- The robot ‘s brain in form of a microcontroller is processes information and controls outputs. ATmega328P chip microcontroller is one such example and there is also Raspberry Pi microprocessors that do the complex computation and decision making.
Sensors
- They are responsible for collecting data from the environment and providing them as feedback for the microcontroller. Examples are distance-measuring ultrasonic sensors, infrared sensors that detect obstacles, and motion or orientation-measuring accelerometers. Precision sensors such as LIDAR are used for advanced navigation and mapping applications.
Actuators
- The electric signals are converted into movement using actuators such as motors, which can be DC motors, stepper motors and servo motors. Additionally, these actuators drive the wheels, arms and other parts of the robot. An example would be using a 12-volt DC motor for small robotic arms, which has a torque output of 5 kg-cm.
Conductive Pathways
- Electric current is able to pass by wires, connectors, and traces that conduct electricity. Copper Track is one of the most used materials due to its low resistance with a measurement of 1.68 x 10^-8 Ω·m. Furthermore, its conductibility is enhanced, making it the best choice.
Control Interface
- For interaction and controlling of the robot, control interfaces are used. These include software that uses Bluetooth and WiFi, buttons, touch screens, or wireless controllers.
Communication Module
- These modules are important when the robot is autonomous or semi-autonomous since they ease data exchange with external modules. Some examples are RF transceivers, ESP8266 WiFi modules as well as HC-05 Bluetooth devices. All these provide extensive coverage with stable connectivity.
Protection Components
- Fuses, diodes and voltage regulators are used to protect the wires and circuits. As an example, using a 7805 voltage regulator provides a stable output of 5V, therefore protecting more delicate electronics from voltage spikes or fluctuations.
Each of these components is integrated and configured according to the specific task and environment of the robot to yield the best performance and reliability. Engineers can design circuits that are up to modern robotics standards by understanding the role of different elements.
Basic Functionality and Purpose
Combining mechanical, electrical, and software elements constructs robotic systems that are capable of performing specific tasks. Robots are designed to undertake hazardous, repetitive, and important tasks with the utmost precision. Several sensors, actuators and processors are embedded in the robot enabling it to interact with the environment and carry out the commands given to it.
Robots today utilize technologies such as artificial intelligence (AI) and machine learning (ML) to enhance flexibility and decision-making capabilities. For example, AI algorithms enable real-time analysis of sensor input which enhances navigation, object detection, and the completion of tasks. Studies show that industrial robots are now capable of increasing production rates by 30%, and with industries such as electronics and automotive, integrating industrial robots, the error margins in the production lines are considerably lowering.
Moreover, the implementation of Internet of Things (IoT) technologies adds effortless connectivity. These advancements not only make processes easy but also ensure cost-effective and scalable operations in fields like healthcare and logistics. The incorporation of sophisticated tools in combination with the principles of engineering continue to push robotics beyond the limits of modern automation.
How Does a Robot Circuit Work?
Understanding Electrical Flow and Signals
A robot circuit functions by the control of electrical streams within a series of elements created to execute predefined tasks. The current starts with a power supply, which is usually a battery or an external source of energy. This current moves through electrical traces to parts like resistors, capacitors and microcontrollers. Commands in voltage or current form are transmitted from a control unit to various devices made of actuators, sensors, and other peripherals. Environment shifts are sensed by the control unit, and adequate information is provided back to the control unit, allowing them to take accurate actions. The efficient distribution of electricity across components within issued parameters makes reliable task execution of robot circuits possible.
The Role of Motors and Power Sources
For any robotic system, motors and power sources are essential components that facilitate energy and motion, enabling task execution. Motors transform electrical energy into mechanical motion, enabling artifacts to perform precise movements and gestures. Consistent energy is delivered to the motor regnts and control circuits, batteries, or power supplies, ensuring reliability. In my view, the smooth interrelation of all these components is important for any mechanized application in terms of efficiency and the intended functionality.
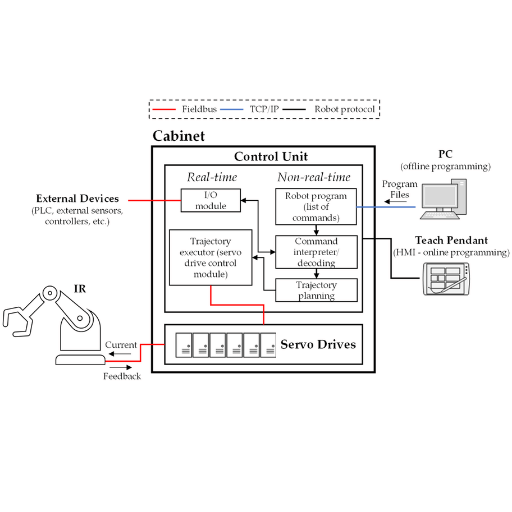
Controlling the Circuit with a Controller
The controller is the robotic system’s brain, receiving inputs, processing them, and producing outputs for circuit functionality management. Modern controllers, including microcontrollers and Programmable Logic Controllers (PLCs), use embedded software for varying levels of operations and processes, from logic and reasoning to complex decision-making tasks with multiple variables. These controllers are customizable and programmable, which permits configuration for specific application needs and requirements.
Take, for example, microcontrollers such as Arduino Unos or STM32s; they can follow specific commands like managing the speed of a motor or taking input from sensors. Modern controllers are equipped with an array of ports and interfaces, such as I2C, SPI, or UART, for communicating with other controllers and devices, which adds flexibility to the entire system. Some advanced devices may also contain real-time clock modules and support for analog inputs, granting more precise control over the operations performed.
The efficiency data emphasizes that the use of an optimized controller greatly improves a system’s accuracy and reliability. For instance, the definition of robotics position control suggests that a robotic arm’s control programming can employ a PID (Proportional-Integral-Derivative) control algorithm, which improves position accuracy by as much as 98% depending on the specific application. Controllers with advanced feedback capabilities also cut energy consumption by responding relatively to the load that needs to be supported. This illustrates that the choice of controller and programming as selected has so much impact on programming responsive and efficient robotic circuits.
How to Assemble a Simple Robot Circuit

Gathering Necessary Components
In order to construct the circuit of a basic robot, the following components are deemed necessary:
- Microcontroller (Arduino or equivalent) – acts as the primary processor of the robot.
- Power Supply (batteries or similar solutions) – provides energy to run the circuit.
- Breadboard – an interface to connect circuit elements with ease and without soldering.
- Jumper Wires are used to interconnect circuit elements on the breadboard.
- Motors (DC or servo motors, for example) – serve as actuators to propel the robot.
- Motor Driver Module (L298N for example) – allows the processor to control motor functions by receiving output signals from the microcontroller unit.
- Sensors (ultrasonic sensors, for example) – allow the robot to receive information for navigation and obstacle avoidance.
- Additional Elements (Resistors and Capacitors as necessary) – Enhance stability and proper functioning of the circuit.
These components, among others, assist in providing control, energy, and movement to interact with the environment effectively.
Step-by-Step Assembly Process
Arrange the Workspace
- Straighten up the workspace by ensuring there is no clutter around.
- Collect all parts needed, which include the chassis, microcontroller, driver module, sensors, resistors, capacitors, along with tools like soldering iron, screwdrivers, and wires.
Assembly of Chassis
- Assemble the robot chassis according to the user guide provided.
- If necessary, add caster wheels along with the other wheels.
Add Driver Module
- Position the driver module (i.e., L298N) onto the chassis’s allocated position.
- Firmly secure the module to the chassis with screws or mounting tape.
- It’s essential to maintain clearance around the module to enable airflow and prevent overheating.
Wire Driver Module to the Motors
- Connect the DC motors to the output ports of the driver module.
- Make sure the motor rotation direction matches your requirements.
Mount the Microcontroller
- Fasten the microcontroller to the chassis using screws or a breadboard fixture temporarily.
- Using pin-out cables configured against the wiring diagram in the datasheet, link the microcontroller and driver module through jumper wires.
Positioning of the Sensors
- Strategically place sensors like ultrasonic sensors on the front or side, depending on the purpose of the robot.
- Brackets and adhesives can be used to fix the sensors.
- Connect the sensors to the microcontroller following the pin configuration.
Add Passive Components
- If necessary, solder the circuit with stabilizing resistors, capacitors, or protective components.
- Ensure the values correspond to the design requirements; for instance, a 330-ohm resistor can be used for LED indicators.
Connections of Power Supply
- Connect the system to its power supply like batteries.
- A switch should be included to control the power flow and disable the robot’s inadvertent powering during assembly.
Verification of Connections
- Check all connections with the multimeter for the possibility of short circuits.
- Ensure the required voltage levels for each of the components are provided.
Uploading Software into Microcontroller
- Make or obtain a control code for the robot.
- With the help of a suitable programmer or USB, upload the code to the microcontroller.
Testing of the entire system
- Switch on the robot to check if all components are functioning properly.
- Make adjustments where necessary to command the motors, read the sensors, and detect obstacles.
Completing the assembly
- Ensure all parts are mounted with zip ties or mounting brackets to prevent components from coming loose.
- Organize the wires to reduce the chances of damage or interference when the device is operating.
A working robot that fulfills all the requirements and is capable of performing to expectations can be built by systematically following these steps.
Testing and Troubleshooting the Circuit
Preliminary Testing
- Make sure that all connections are at their proper locations and are securely fastened.
- Apply power to the circuit and use a multimeter to check that each component gets the proper voltage.
Functional Testing
- Evaluate separate modules, such as sensors and actuators, to verify operation.
- Verify that you see the expected results on LEDs or display panels.
Finding Generic Problems
- Look for any loose wires, shorts, or wrong pin placements.
- Check that all components are correct and that the desired polarity is set.
Corrective Action Procedures
- Fix or replace any broken components.
- Confirm that the physical implementation of the design matches the wiring diagram.
- Strategically isolate parts of the circuit for easier diagnosis.
By following these procedures outlined above, you will be able to ensure that the circuit is functioning properly and meets the design intended.
What Wires and Insulation Are Used in Robot Circuits?

Types of Wires in Circuit Design
Solid Core Wires
- Solid core wires have single strands, which makes them highly conductive. They are suited for permanent or inflexible connections, like breadboards and internal circuit connections.
Stranded Wires
- Stranded wires are flexible and resilient. They consist of individual strands which have been twisted together. These wires are often used in robotics where frequent circuit movement occurs.
Shielded Wires
- An additional layer of shielding to reduce interference from electromagnetic signals makes shielded wires ideal for use in circuits where signal integrity is crucial, such as communication or sensor lines.
High-Temperature Wires
- Wires like these are crucial for circuits located near heat sources like motors and power systems as they are designed to withstand high temperatures.
When choosing a wire type, considering its flexibility and durability, along with the environmental conditions, is crucial, as is ensuring the wire’s specifications comply with the design’s current and voltage requirements.
Importance of Insulating Electrical Circuits
Proper insulation of electrical circuits is vital for their safe operation, efficient use of power, and increasing the lifespan of electrical systems. Insulation helps retain current in the circuit, thereby diminishing the chances of shocks, short circuits, and even fire hazards. Also, it protects the wires from external damage due to moisture or extreme temperatures, which can accelerate deterioration over time. Effective circuit design tailored for reliable performance requires high-quality insulation that minimizes energy loss while ensuring reliable operation; this makes insulation a core element of safe and effective system design.
Choosing the Right Materials for Safety and Efficiency
Choosing the right materials to maximize effectiveness and safety is pivotal in electrical systems. Modern wiring insulation is typically composed of PVC, XLPE, and Teflon, each with specific advantages for different uses. For example, PVC is flexible, offers good resistance to environmental degradation, and is cost-effective. In industrial or high-voltage applications, XLPE is more advantageous due to its superior thermal properties and ability to withstand higher temperatures. Teflon, on the other hand, is excellent in dielectric strength and heat resistance, making it useful for aerospace or medical equipment.
Materials such as XLPE are reported to safely operate at temperature criteria of 90°C for extended periods of time, with 250°C peak tolerance allowances for short bursts. Studies also suggest extreme circumstances are no match for Teflon’s high-performance insulation, with over 200°C dominating tolerable temperatures. Moreover, FOR flame-retardant grades of PVC showcase the profound ability to meet and adhere to stringent fire safety regulations, mitigating fire risks within residential and commercial spaces.
As well as temperature and mechanical strength, a material selection also needs to take into account chemical resistance as well as the impact on the environement. New materials like bio-based polymers are attracting interest due to their lower carbon emissions and similar performance characteristics. Engineers can enhance safety, durability, and sustainability in the design of electrical systems by aligning material specifications with application needs.
Integrating Software and Control Mechanisms
The Role of Programming in Robotics
Automation or semi-automated tasks are made possible with robotics programming, which serves as a cornerstone in robotics. It gives commanders, sensors, actuators, and control subsystems the information required to function in a cooperative and efficient manner. Programming enables robots to process information from their surroundings, make decisions, and take accurate actions. Flexibility and ease of use make Python a key programming language in robotics, while C++ is the language of choice for performance-demanding applications. Well-structured logic ensures that robots are dependable and offer versatile solutions to complex tasks across industries such as healthcare and manufacturing.
Using Arduino and Raspberry Pi for Control
Both Arduino and Raspberry Pi are among the most popular platforms used in robotics and automation, owing to their accessibility. As an open source microcontroller platform, Arduino is unmatched when it comes to hardware specific actions such as motor control, sensor reading, and sending out signals. It is best suited for low power tasks and applications which are real time in nature owing to its simple structure and light weight.
In contrast, Raspberry Pi is a single board computer that offers superior processing capabilities than Arduino. It can perform high level tasks such as image processing and machine learning due to having an operating system onboard. Moreover, Raspberry Pi can run numerous programming languages like Python which enhances its scope for software development.
An integrated approach of both platforms will enhance the capabilities of a robotic control system. For instance, the reading of sensors and controlling of the actuators can be handled by the Arduino, while communicating and analyzing data remotely can be controlled from the Raspberry Pi. This approach can enable the creation of highly complex and detailed robotic systems.
Also, the new open-source libraries and extensions available for both platforms have further enhanced their ability to function. For example, the Raspberry Pi 4 has up to 8GB of RAM and a quad-core CPU that works at 1.5 GHz. This allows the device to efficiently process large data sets. Likewise, both Wi-Fi and Bluetooth are now available on newer models of Arduino devices, such as the Portenta H7 which boasts dual-core processors.
The combination of the capabilities of both Arduino and Raspberry Pi enable engineers and developers to build advanced solutions in industrial automation, healthcare, and educational robotics, driving innovation and technological advancement in many industries.
Creating Interactive and Responsive Systems
These systems interpret user-generated inputs or environmental changes through sensors, actuators and control logic, enabling responses through interaction. To users, these systems appear to operate automatically, responding as sensors gather information, capturing temperature, motion, or light levels, and actuators execute actions based on the programmed responses. For example, a motion sensor can turn a motor that opens a door. Smart homes, automated manufacturing, and wearable technology are a few examples that make use of such systems, offering ease of use, which leads to end-user satisfaction.
Frequently Asked Questions (FAQs)
Q: What is the robot’s circuit design?
A: Robot’s circuit design is the development of a myriad of electronic circuits which enables a robot to function. This often involves designing the electric circuit schematic, picking the suitable parts such as electric motors or batteries, and crafting the design so that the robot works and can keep working efficiently.
Q: What is the procedure for adding a battery to a robot circuit?
A: For adding a battery into a robot circuit, place the battery inside the holder and make sure that the positive and negative terminals align with the established design. Typically, the red terminal will need to be attached to the positive of the circuit.
Q: What grousers are most common to a simple robot circuit?
A: A simple robot circuit will usually need a power supply like a battery, electrical elements such as a resistor or a capacitor, a controller, and even output devices like electric motors. Occasionally, other elements like a sensor or a microcontroller may be added to provide additional functionality.
Q: In what ways can cardboard be utilized in designing a robot’s circuit layout?
A: Cardboard can assist in prototyping the physical structure of a robot’s circuit. Its light weight and modifiability gives the ability to temporarily attach components and try out many configurations before deciding on the circuitry.
Q: What is something you need to design a robot’s circuit diagram?
A: While designing a robot’s circuitry diagram, one needs to factor in the electrical flow, component positioning, and constrictions like the volume and mass. The diagram should align with the intended model, detailing all linkages in an unambiguous manner.
Q: How can I make sure my robot’s circuit has reliable and safe connections?
A: Clip, nut, and other similar components can be used. Make certain the connections are complete and non-corroded to avoid failure in electrical continuity. The use of insulated wires also helps in preventing short circuits.
Q: How does electrical engineering integrate with designing circuits for a robot?
A: Electrical engineering greatly impacts robot circuit design because it provides the fundamental knowledge of what makes a circuit work well. For example, understanding the function of electronic components is important for effective robot design.
Q: In which ways does a robot’s behavior change as its circuitry becomes more complex?
A: A robot’s behavior is affected by the complexity of its circuitry. Basic circuits are capable of handling rudimentary operations, but more intricate designs permit sophisticated features, including self-controlled transitions and advanced mechanical processes.
Q: How could the design of a robot’s circuitry be beneficial for teaching?
A: The various educational purposes of robot circuit design range from illustrating principles of electronics to System Design Challenge (SDC) problem demonstrating the practical use of electrical engineering in the educational curriculum for school pupils and enthusiasts.
Q: Which tools and materials do you need to build a robot circuit?
A: Tools and materials necessary to build a robot circuit comprise a soldering iron for permanent joints, nut and screwdrivers, adhesive tape, and conveniently tailored Velcro strips for repositionable parts.
Reference Sources
1. Memristive Circuit Realization of Robot Application-based Self-Healing Network Inspired by Biological Astrocytes
- Writers: Q. Hong, Hegan Chen, Jingru Sun, and Chunhua Wang
- Journal: IEEE Transactions on Neural Networks and Learning Systems
- Year: December 31, 2020
- Reference Token: (Hong et al. 2020 pp 2106—2120)
- Abstract: The self-repairing neuron network presented in this work implements a memristor based a robotic system and in a structure that can change the memristors,”. This design further improves the performance and dependability of the robot.
- Methodology: The authors created a circuit that allows the robot to identify and correct faults in its neural network and said network heeds the biological self-repairing traits of astrocytes. The simulations conducted as part of the research prove the designed circuit remains operational, irrespective of the damage inflicted on it.
2. Human-Robot Collaboration Scheduling in Assembly of Printed Circuit Boards within the Framework of Constraint Programming
- Authors: M. Mokhtarzadeh, R. Tavakkoli-Moghaddam, Behdin Vahedi Nouri, Azadeh Farsi
- Journal: International Journal of Computer Integrated Manufacturing
- Publication Date: March 10, 2020
- Citation Token: (Mokhtarzadeh et al. 2020, pp. 460–473)
- Summary: This study analyzes the workload distribution between human workers and robots in automated PCBA (Printed Circuit Board Assembly) systems with the aim of minimizing makespan. Scheduling challenges have been identified to be one of the key impediments for productivity and efficiency in a manufacturing environment.
- Methodology: A Constraint Programming (CP) method was designed to approach the scheduling problem based on several partitions of tasks, including no-wait scheduling. The authors created multiple experimental instances to evaluate the performance of the CP approach relative to other techniques using mathematical programming.
4. A New Three-Dimensional Chaotic System with a Hidden Attractor, Circuit Design and Application in Wireless Mobile Robot
- Authors: S. Vaidyanathan, A. Sambas, M. Mamat, W. S. M. Sanjaya
- Journal: Archiwum Teorii i Automatyki
- Publication Date: December 1, 2017
- Citation Token: (Vaidyanathan et al., 2017, pp. 541–554)
- Summary: With emphasis on circuitry and robotic applications, this work focuses on controlling wireless mobile robots by way of a new chaotic system developed exclusively for this purpose.
- Methodology: This study’s scope involves designing a chaotic circuit and using it to control a mobile robot. The authors consider the system’s qualitative characteristics and how it optimizes the robot’s control.
6. Robot


